Page 4 of 8 FirstFirst 12345678 LastLast
Results 46 to 60 of 110

Thread: EATC o-ring repair - How to... with pics.

  1. #46
    Join Date
    Oct 2004
    Location
    MO
    Age
    65
    Posts
    1,394
    This is an excellent thread. Thanks to all who've contributed.

    I had the air out of the defrost under acceleration symptom. Ran the EATC self test. No codes, just 888 with everything else lit. Decided to replace o-rings last weekend. Easy to do with all these pics! Used silicone orings and a bit of dielectric grease on them as recommended. All back together and worked fine for about 15 minutes. Then fan went full blast like it was in max mode. Tried lowering speed but it took several up and downs of fan dial to lower speed. A few minutes later same thing. . .rats. Air blows out of correct vents selected, sometimes a few surges before going full blast. I do remember the foam under the tabs was a bit beat up on one. EATC self test still good. Any ideas where to go from here? Thanks!
    ncmm
    '04 Silver Birch MM 300A, build date:03/11/04, bought new 10/04 traded 8/08, 27k miles,

    '04 Silver Birch MM 300A, build date:12/23/03, bought used 3/16/12, 24k miles
    113k miles as of 8/21/19. . .

    update. . . sold 11/5/2019, 116k miles

    Visit My Old Gallery

  2. #47
    Join Date
    Jan 2004
    Location
    Somewhere in the N.C. Triangle
    Age
    68
    Posts
    26,272
    Quote Originally Posted by ncmm View Post
    This is an excellent thread. Thanks to all who've contributed.

    I had the air out of the defrost under acceleration symptom. Ran the EATC self test. No codes, just 888 with everything else lit. Decided to replace o-rings last weekend. Easy to do with all these pics! Used silicone orings and a bit of dielectric grease on them as recommended. All back together and worked fine for about 15 minutes. Then fan went full blast like it was in max mode. Tried lowering speed but it took several up and downs of fan dial to lower speed. A few minutes later same thing. . .rats. Air blows out of correct vents selected, sometimes a few surges before going full blast. I do remember the foam under the tabs was a bit beat up on one. EATC self test still good. Any ideas where to go from here? Thanks!
    The foam has nothing to do with the blower speeds.

    One of two things could be wrong.

    1 - Blower Control Module could be going bad.

    2 - The electronics inside the EATC can be going bad.
    “When you can’t make them see the light, make them feel the heat.”
    Ronald Regan

    "The only way to deal with the Islamic State - these blood thirsty, blood-drunken, terrorists -
    is to kill them, keep on killing them, until you kill the last one, then you kill his pet goat."

    Lt. Colonel Ralph Peters

    “Be polite, be professional, but have a plan to kill everybody you meet.”
    "I come in peace. I didn't bring artillery. But I'm pleading with you, with tears in my eyes, if you **** with me, I'll kill you all"
    General James Mattis


  3. #48
    Join Date
    Jul 2012
    Location
    coral springs FL
    Posts
    3

    Fixed mine.

    Thanks. Glad I looked it up on the site. Saved a lot of money and took no time. Fixed mine before vacation.

  4. #49
    Join Date
    Jun 2013
    Location
    Nutfield, NH
    Posts
    2
    I replaced the o-rings (silicone o-rings from Grainger), no change, still blowing only through defrost vent under all conditions. Next I blew out the vacuum tubes with compressed air and sealed the vacuum connector to the EATC with dielectric grease. Still no luck. The original o-rings were all still pliable and the filter foam on the solenoids was still good.
    Finally bit the bullet and bought a Dorman remanufactured EATC. Now all is good. And I still saved about $600 over going to a dealer due to all of the good info here.
    Thanks.

  5. #50
    Join Date
    Dec 2007
    Location
    Toronto, Ontario, Canada
    Age
    52
    Posts
    1,416
    What size (or "#") o-ring is required?
    "Barry's" the name;
    Drums and Cars are my game

    "I smash the pedal; air and fuel go in; witchcraft happens; I go fast!"

    "No question is stupid, if you don't know the answer!"


    2004 / Black / 1981 of 3214.
    #184 of 509 in black out of 1214 total in all three colors with the moonroof option.

  6. #51
    Join Date
    Sep 2010
    Location
    Newport, RI
    Age
    61
    Posts
    956
    Quote Originally Posted by Rockettman View Post
    What size (or "#") o-ring is required?
    http://www.grainger.com/Grainger/ORing-1REC2
    2004 DTR
    Born 9/25/2003 Adopted Aug 11, 2010
    #175 of 980 DTR, #537 of 3,214 2004

    Lidio Tune, K&N CAI, 4.10s, FlowMaster40s, SS Braided brake lines, SS Bumper Inserts, Mach 1 Chin Spoiler, Lip Spoiler, Grill & Trunk Badges by Daniel, Audiophile 6L8T18C815FD.


  7. #52
    Join Date
    May 2006
    Location
    Cherry Hill, NJ
    Age
    75
    Posts
    242
    Quote Originally Posted by Nutfield View Post
    I replaced the o-rings (silicone o-rings from Grainger), no change, still blowing only through defrost vent under all conditions. Next I blew out the vacuum tubes with compressed air and sealed the vacuum connector to the EATC with dielectric grease. Still no luck. The original o-rings were all still pliable and the filter foam on the solenoids was still good.
    Finally bit the bullet and bought a Dorman remanufactured EATC. Now all is good. And I still saved about $600 over going to a dealer due to all of the good info here.
    Thanks.
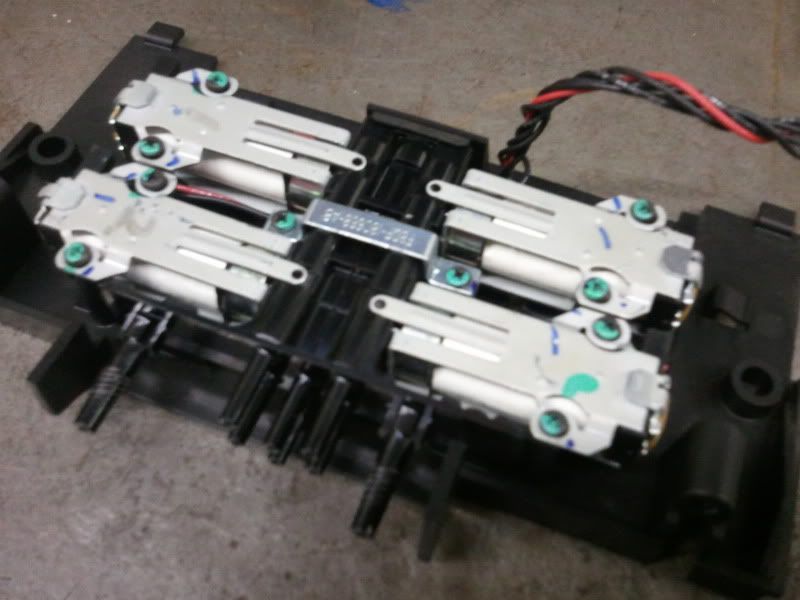
    You may have been victim to the same problem I had. It is the lesser found of this particular problem. O-rings and other fixes won't help. What I found, after going through all the otherwise great fixes, was that the plastic valve body, on which the solenoids and O-rings sit, was defective. That is, there were hairline cracks along the molding lines. I tried using RTV, but it doesn't adhere well to most plastics, and if the crack is under the solenoid, you are SOL. I found a used control head and basically used the plastic body with my otherwise rebuilt original control head to fix the problem.

    I documented this particular problem about 2 summers ago. By then, I found at least several more MM posters with this exact problem.
    - Randy

    2004 MM (Wine Red [it looks like wine to me!])
    XCal2/Blue Oval Chips Programming

    1996 Impala SS (12.45 NA)

  8. #53
    Join Date
    Jun 2013
    Location
    Nutfield, NH
    Posts
    2
    Quote Originally Posted by racorcey View Post
    You may have been victim to the same problem I had. It is the lesser found of this particular problem. O-rings and other fixes won't help. What I found, after going through all the otherwise great fixes, was that the plastic valve body, on which the solenoids and O-rings sit, was defective. That is, there were hairline cracks along the molding lines. I tried using RTV, but it doesn't adhere well to most plastics, and if the crack is under the solenoid, you are SOL. I found a used control head and basically used the plastic body with my otherwise rebuilt original control head to fix the problem.

    I documented this particular problem about 2 summers ago. By then, I found at least several more MM posters with this exact problem.
    Thanks for the info. I will keep this in mind if the problem recurs with the remanufactured EATC. Still, $239 after my core refund isn't too bad. I have been a Ford fan since before I bought a new 5.0 Mustang LX in 1990 (still have it) and this EATC may be the worst design that I have ever seen, and I was dumb enough to buy a '04 Freestar, so that's saying a lot.
    Btw, my car is a '08 Crown Vic. MercuryMaurader.net had the best info for this problem.

  9. #54
    Join Date
    Oct 2010
    Location
    Vero Beach
    Posts
    780
    Anyone know which solenoid controls each function? I replaced the o rings and air does not come through the vent but all others work...floor, defrost and floor/defrost
    VMARAUDER -
    2004 Dark Toreador Red
    Simply called "The Red Car", Build Date 4-20-2004, #2618 of 3214, #849 of 980 in DTR, Stainless Works LT Headers with SW Full Exhaust, Ford Racing 4.10 Gears, Carbon Clutches, Dyno by Modern Muscle, Mo's Speed Shop Tune, 277 rwhp 296.43 torque, Moonroof, Rear Spoiler, K&N CAI, Alpine CDA-117 CD Receiver, PAC SWI-JACK Steering Wheel Control , Rear Spoiler, Viper Alarm, From Sparta Performance...Rear Upper and Lower Control Arms, Watts Link, Stainless Steel Brake lines, Raybestos R300 S Groove Rotors with Advance Tech Ceramic Pads, Pro-Gard


    It Ain't What You Got It's The Way You Use It


    New DD 2014 F150 Lariat - EcoBoosted
    and 2013 Lincoln MKX
    1998 Grand Marquis GS 175K Sold at 199k
    2001 Lincoln Town Car Gave away at 251k
    RIP 2003 Garnd Marquis LS 280k miles
    RIP 1990 Lincoln Town Car Cartier 295k miles

  10. #55
    Join Date
    May 2006
    Location
    Cherry Hill, NJ
    Age
    75
    Posts
    242
    No, but....you could try hooking up a hose to each one and try sucking/blowing through each valve. With no voltage applied to each solenoid, I believe that the valves are in the closed position (although I can be wrong on this). Even so, if it is the reverse, you could apply 12 volts to each individual solenoid and then try the suck/blow test again.

    Bottom line - if any of them leak, either the o-ring was not installed correctly, or you might just have a crack in the plastic manifold - just like the problem I had.

    You could also check the continuity of each solenoid with an ohm-meter to insure they're all the same.

    Otherwise, you may be looking at bad (electronic) controller.

    Heck - at least the weather has cooled down somewhat!
    Last edited by RF Overlord; 10-16-2013 at 09:15 AM. Reason: no need to quote pic
    - Randy

    2004 MM (Wine Red [it looks like wine to me!])
    XCal2/Blue Oval Chips Programming

    1996 Impala SS (12.45 NA)

  11. #56
    Join Date
    Oct 2010
    Location
    Vero Beach
    Posts
    780
    Thanks Randy...continuity check was ok so I will just redo it later
    VMARAUDER -
    2004 Dark Toreador Red
    Simply called "The Red Car", Build Date 4-20-2004, #2618 of 3214, #849 of 980 in DTR, Stainless Works LT Headers with SW Full Exhaust, Ford Racing 4.10 Gears, Carbon Clutches, Dyno by Modern Muscle, Mo's Speed Shop Tune, 277 rwhp 296.43 torque, Moonroof, Rear Spoiler, K&N CAI, Alpine CDA-117 CD Receiver, PAC SWI-JACK Steering Wheel Control , Rear Spoiler, Viper Alarm, From Sparta Performance...Rear Upper and Lower Control Arms, Watts Link, Stainless Steel Brake lines, Raybestos R300 S Groove Rotors with Advance Tech Ceramic Pads, Pro-Gard


    It Ain't What You Got It's The Way You Use It


    New DD 2014 F150 Lariat - EcoBoosted
    and 2013 Lincoln MKX
    1998 Grand Marquis GS 175K Sold at 199k
    2001 Lincoln Town Car Gave away at 251k
    RIP 2003 Garnd Marquis LS 280k miles
    RIP 1990 Lincoln Town Car Cartier 295k miles

  12. #57
    Join Date
    Feb 2011
    Location
    Northshore MA
    Posts
    51
    Another happy owner here, I had defrost only, replaced O-rings now everything is back to normal. The job took less time than I thought.

  13. #58
    Join Date
    Feb 2006
    Location
    middle of iowa
    Age
    41
    Posts
    2,772
    yey, I made it to sticky thread level. (sorry havnt been on in a while)

  14. #59
    Join Date
    Feb 2007
    Location
    Denver, Colorado
    Posts
    137
    After 2 years of putting up with air only coming out of the defrost vent I finally attempted this repair job. Worked like a champ!!! parts and supplies were less than $10.00 and took me 2.5 hours to do. My indy mechanic would not do the repair. And the dealership wanted $1,300. $900 just for the part. During my repair I noticed that two of the o-rings were okay and the other two were brittle. Four new silicon o-rings installed with a nice coating of dielectric grease and working great.
    Now this post is excellent but for those of you that would appreciate video instruction these two links are a must.
    1.) All the details including parts ordering information: https://www.youtube.com/watch?v=y0IWspXkQtE
    2.) The minor dashboard work to remove the EATC: https://www.youtube.com/watch?v=S2Q0SvvE-gg.
    Happy New Year!!!

  15. #60
    Join Date
    Aug 2008
    Location
    Auckland
    Age
    60
    Posts
    40
    This is an excellent repair blog, well done. I followed the instructions and now have cold air blowing on my face again.

    One question I haven't seen asked or answered is do you think this o-ring problem could lead to a lean running condition. I also have diagnostic code 171 and 174 up!

Page 4 of 8 FirstFirst 12345678 LastLast

Thread Information

Users Browsing this Thread

There are currently 1 users browsing this thread. (0 members and 1 guests)

Similar Threads

  1. EATC Repair
    By fastblackmerc in forum Marauder Innovations
    Replies: 25
    Last Post: 06-18-2015, 04:43 AM
  2. Eatc repair success
    By marauder410 in forum Shop Talk
    Replies: 3
    Last Post: 06-06-2012, 01:19 AM
  3. Eatc repair??
    By biggeorge04 in forum Shop Talk
    Replies: 6
    Last Post: 09-23-2011, 10:10 PM
  4. EATC Repair
    By PonyUP in forum Southern Marauders
    Replies: 52
    Last Post: 06-28-2011, 06:13 PM
  5. Did the O-ring EATC repair...few questions.
    By 68Camaro in forum Shop Talk
    Replies: 5
    Last Post: 05-14-2010, 07:48 PM

Posting Permissions

  • You may not post new threads
  • You may not post replies
  • You may not post attachments
  • You may not edit your posts
  •